Overview
Switchgrass arose from one of my Game Level Design assignments. We were tasked with creating a racetrack for an arcade racing game. Later, we used the same racetracks to design and program AI opponents for a programming course.
As I am a massive fan of Burnout 3: Takedown, something that my friends and most of my professors (who referenced it during their slides!!) know all too well, this was one of my favourite level design assignments.

NOTE
This is a modified and expanded version of the project summary for Switchgrass, which I chose to separate due to length.
Brief
We were required to design racetracks in Maya that we brought into Unity, with provided car and camera controls (that we weren’t allowed to modify). This assignment also required the use of several, distinct paths, namely:
- Regular Path: The longest path, considered the ‘default’
- Shortcut: A skill-based shortcut that — if executed correctly — allowed for significant time savings.
- Alternate/Failure: Either a split from the main/shortcut OR a consequence of failing to perform the shortcut.
Challenges
One aspect that I found immediately limiting (but later appreciated) was the time requirement. A single lap (out of 3) had to be about 30 seconds on the ‘regular path’.
Another point of friction was the Maya requirement. I’d been a firm Blenderer since about 2013 (after moving up from SketchUp after several years) and wasn’t too fond of paid, subscription-based software. This assignment changed my perspective on it, however, and I grew to really enjoy the workflow, and especially the plethora of vertex manipulation tools. If only it didn’t cost one billion dollars.
Design Methodology
Arcade racers are like, my thing, so I took this assignment very seriously. Due to two loosely-coincidental factors, the first being that the provided car was red, and the second being that I was watching The Art of Racing in the Rain on repeat, being one of newest comfort movies, I decided early on that the car was going to be a Ferrari. This was of course, not at all asked for in the brief.
Research
Partly due to being in theatre as a kid, and also because I like to really ‘immerse’ myself into any project I dive into, I started by exploring the feeling I wanted to evoke in the player as they played my racetrack.
Since I’d decided on the Ferrari theme early on, I enqueued my favourite Italian-American songs (Louis Prima, Tony Bennett, Bobby Darin, and Dean Martin). I listened to this playlist on repeat for a couple of days.
I also found two (2) versions of Quando M’Innamoro, the song Humperdinck’s A Man Without Love is based on, that I really enjoyed. These were the recordings by The Sandpipers and Anna Identici.
What ensued was five hours of listening to these two songs as I played Burnout 3’s Road Rage mode (in a red car, of course). Something that stood out for me immediately is how I felt myself entering a flow state during the turns. I knew I wanted a very flowy racetrack, with curves and undulating ‘waves’, and this led me to explore more nature-based areas.
Shortcut and Setting
Since I had some yarn (for crochet) at my desk in our lab and like using physical tools to aid my design process, I played around with a piece of string, molding it as I imagined myself driving over it, adding turns at the right moment, with short pauses in between. This was also when I thought of having my shortcut be a jump over one of these curved sections, earning you a decent time-save if you were able to perform it correctly.
Knowing this, the Grand Canyon seemed like a no-brainer, and I imagined driving over some more unpaved roads and also having this long straight bridge section, inspired by designs from state park posters.
We were also given a set of texture-mapped ‘base’ pieces we could use to build our racetrack. This was like a stripped down modular kit, and being able to quickly try different layouts really helped in my design process.
Level Design Document (LDD)
Given these constraints and a rough idea of what I wanted to do, I submitted the following as my initial LDD:
Constructing the Racetrack (and Iteration)
This part was the longest and most time-consuming, for obvious reasons. The detailed process of going from conceptual design to actual, playable track and the countless hours of playtesting and iteration would require a lot more room than I had planned for this series.
I let the rest of this article marinate as a draft as I considered my options, finally settling on a series of short Challenge -> Solution (or Hack) items, with the hope that some of this may prove useful to you.
Challenge 1: Player Controller and Camera
The first challenge had to do with the provided (and immutable) vehicle controller and camera. If you’re familiar with the Three C’s (3C) framework of Character, Camera, and Controls, here’s my not-at-all biased take on them:
- Character (Car): Utterly primitive, all-or-nothing steering and throttle (-1, 0, or 1)
- Camera: A simple follow camera with zero collision/clipping avoidance
- Controls: Bad enough to make you chuck your gamepad at the wall
The steering was particularly frustrating, because unlike Burnout (or literally any arcade racer post Y2K era), you had very little control over how the car handled. Well almost.
There were two key ‘secrets’ I discovered:
- The controls weren’t half bad when using a gamepad. I always have atleast one controller on my desk (usually two, a DualSense and Xbox Controller, from my work playtesting and making a controller-specific glyph sytem for Furlastic Duo).
- On keyboard, if you ‘feathered’ the A and D keys just right, you could take advantage of the vehicle’s ability to skid to get a nice feeling turn. However, this did require having a limited collection of angles that felt good to drive on.
These discoveries allowed me to design a level that was playable on either gamepad or keyboard, with slightly varying skill ceilings, while keeping the ‘flowy’ feel I wanted intact.
Also, the camera limitation ended up being a bit of a nice design constraint. Since I wanted a canyon but clipping into the wall during normal gameplay was unacceptable, I used flat lower sections (near the road) on the canyon meshes, with them tapering upwards. This helped give them a nice look, with very simple, flat-shaded colours.
TL;DR #1: Know your enemies (evil player controllers and cameras)
Challenge 2: Track Length
Second, however, had to do with with the actual lap times. After settling on basic turn metrics, including angles and their respective lengths that felt right, I first made a rough, completely flat ‘greybox-ish’ version of my primary path to test out timing.
I found that since the controller was both much slower than most arcade games and harder to steer, the initial layout I’d planned on was just too long. I had to shrink a few areas to maintain the thirty second lap target. Many sections had the feel and pacing I wanted in my design so this was a careful craft of picking what was essential to my experience.
Here are some of the changes from the rough yarn prototype to a playable version in Unity:
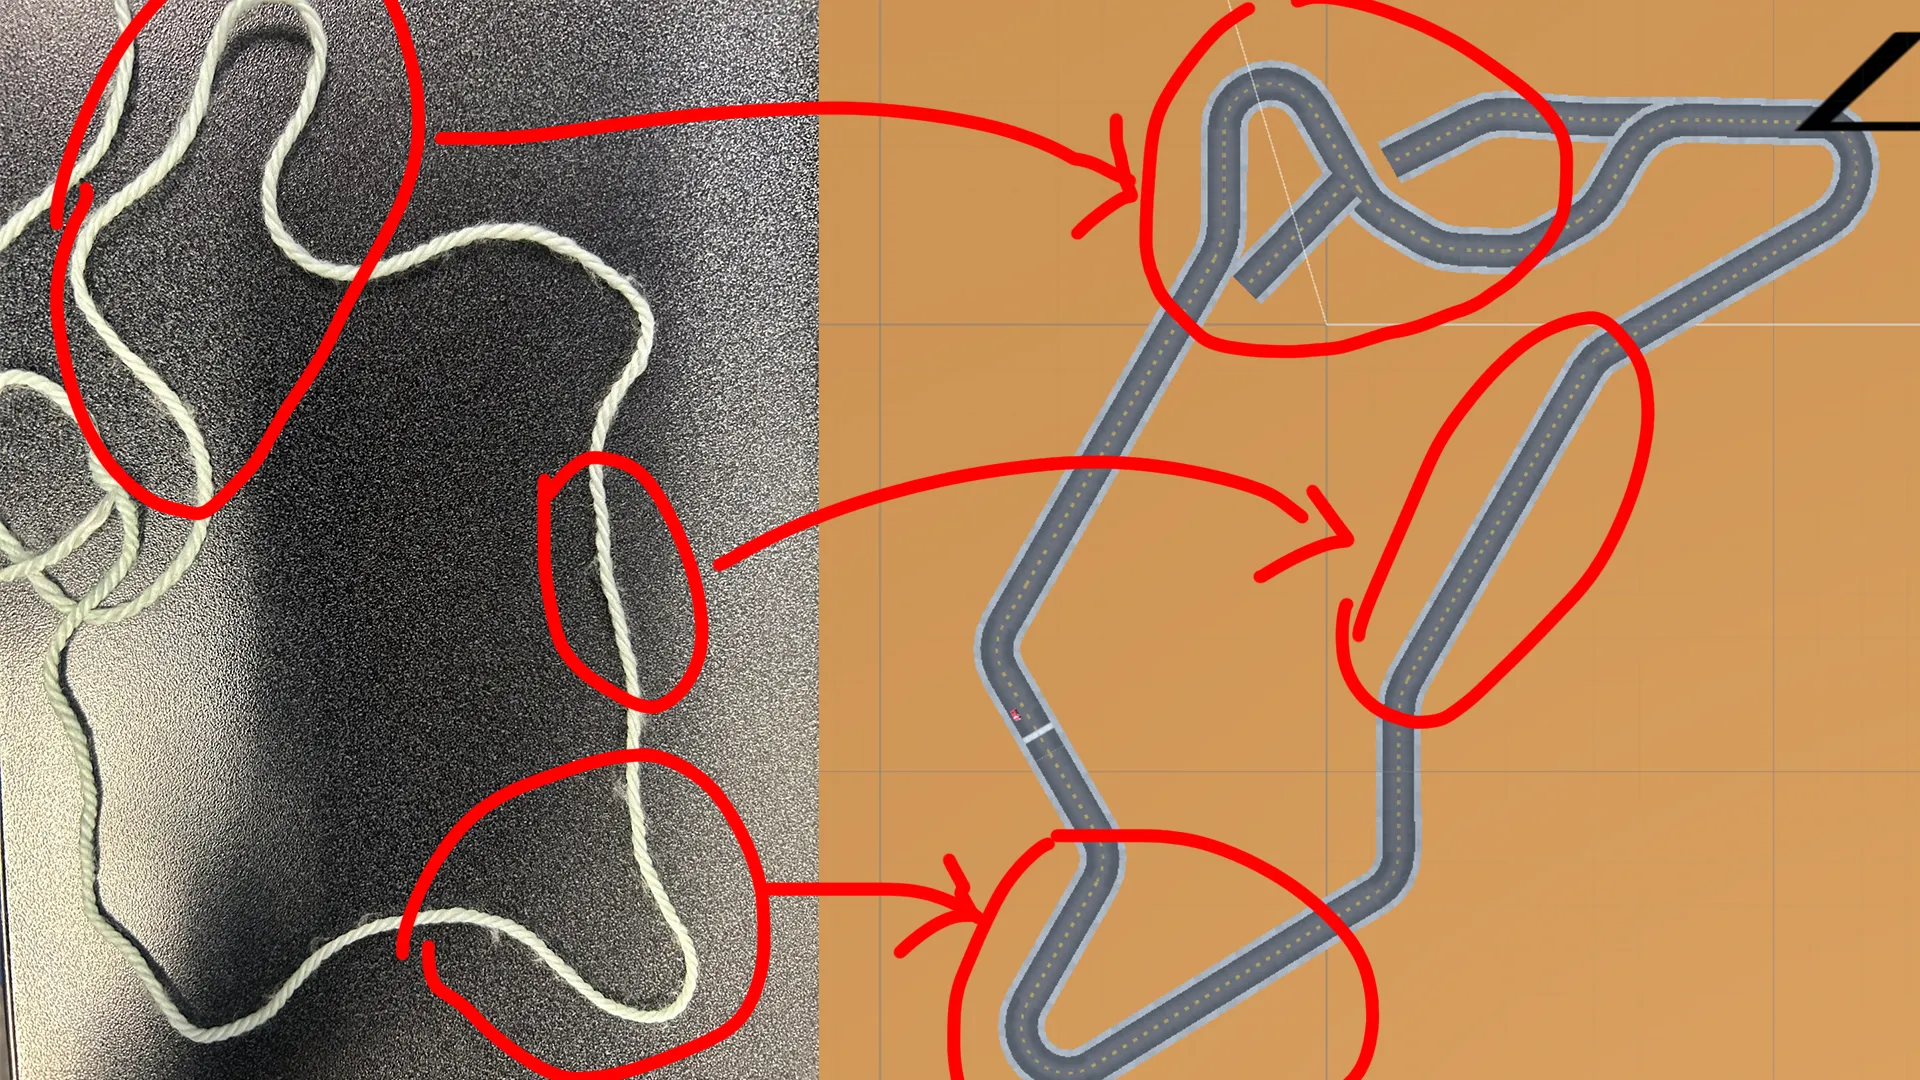
I was able to keep most of what I cared about, but did have to get rid of the first turn, a choice that had some repercussions later (see Challenge #4).
TL;DR #2: Kill your babies, but know them well enough to keep what’s core
Challenge 3: Physics and Collisions
Next, since I dealt with a range of inclines and also had overlapping jumps, my actual track mesh, although low-poly, was simply not enough for my ‘walls’. The ‘fix’ was simply to ensure my walls (from my invisible collision mesh) were tagged as such explicitly and were completely upright, because of how this system was set up.
As a neat side effect, this allowed me to be quite creative with my visual wall geometry (the canyon), specifically using carefully angled faces so that I could get pretty looking lighting despite the extremely low polycount of the meshes and default shaders for this prototype.
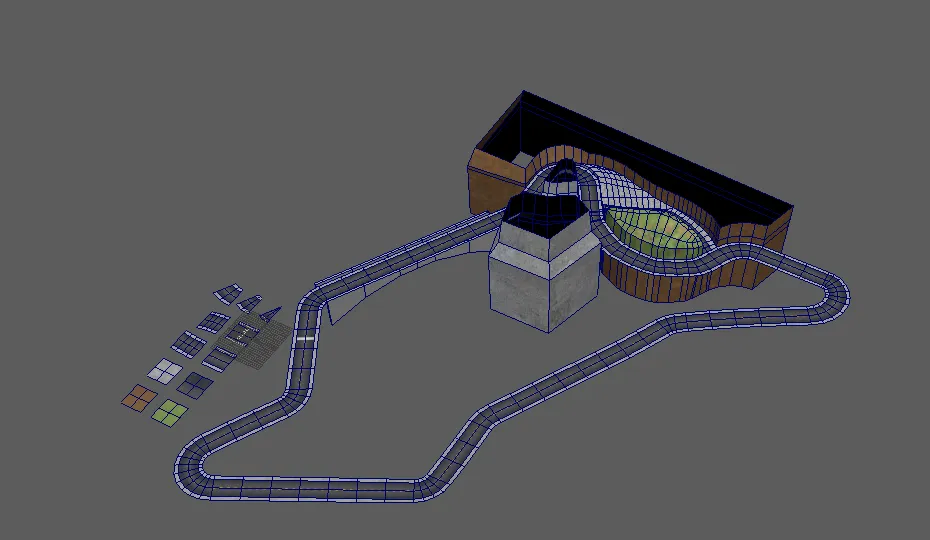
Here’s the collision mesh, visualized in magenta:
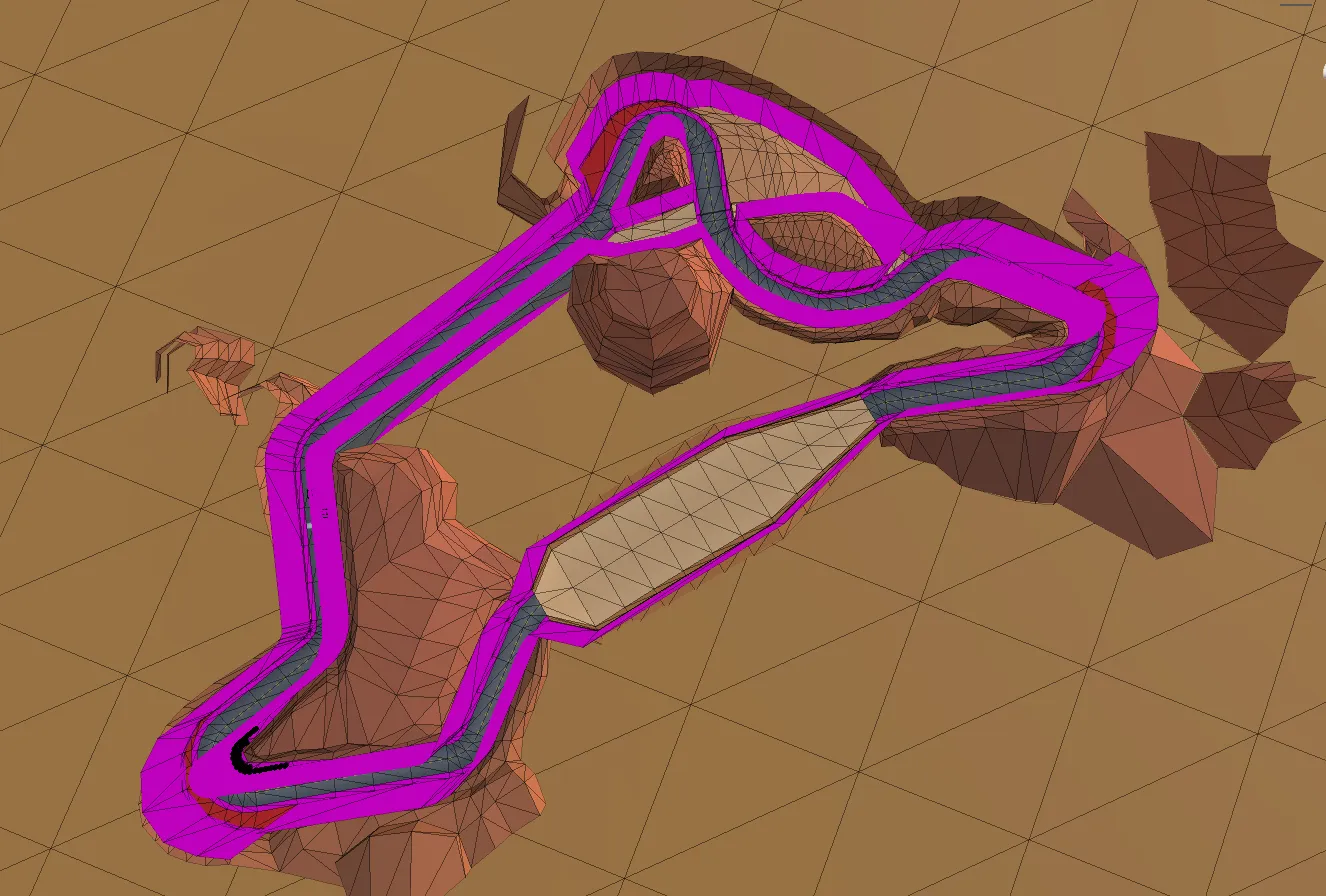
Additionally, I did not want to punish the player too harshly for failing a turn (I’m not THAT evil), so with the exception of the second hairpin (that I wanted to keep as a ‘skill test’), I used smooth wall curves with runoff areas, coloured in red.
This prevented stopping the user abruptly mid-race, perhaps the cardinal sin in fast-paced arcade racing games. It wouldn’t let them maintain a perfect lap time, but it provided some opportunity to regain lost time.
TL;DR #3: Optimize your collision meshes for players
Challenge 4: First Hairpin Difficulty
Finally, as a consequence of shortening my racetrack to meet the time constraint, I introduced the first hairpin turn much sooner. This turn felt really good, and is probably my favourite turn in the track, because I designed it so that if you follow the racing line just right, you get this nice little view of the bridge.

The issue, however, was that playtest-after-playtest, players complained about this turn being too hard too soon. Suggestions included simplifying the turn, moving the start point, and removing it entirely. These were all fine options, and offered with the bestest of intentions, but my gut told me that I was right about this turn so I kept the track exactly as is.
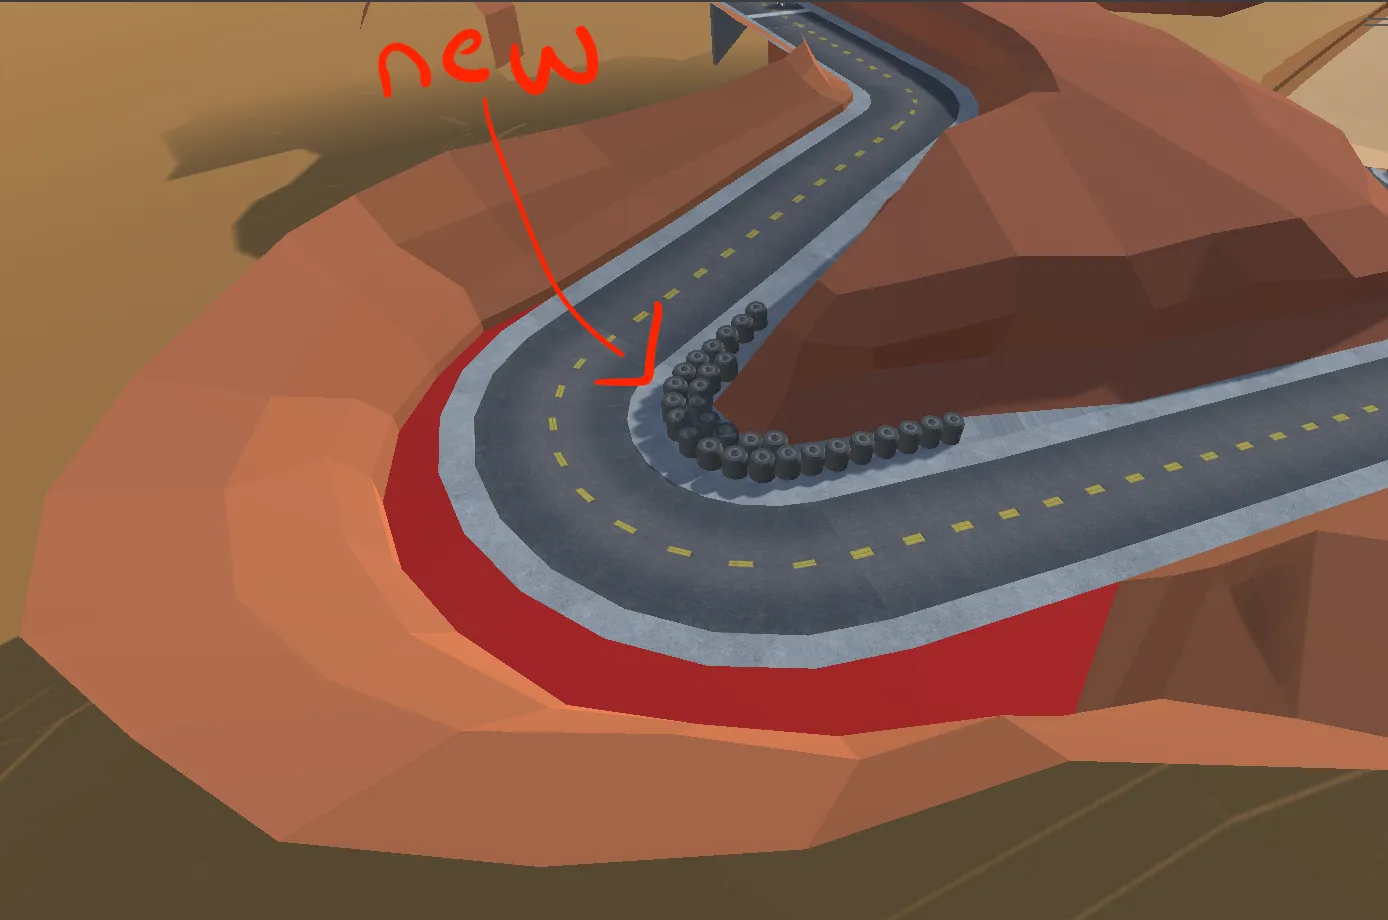
I just added some tyres. The actual collision mesh did not change at all. Quite remarkably, all complaints about this turn ended after this little change, and I even got praise for the ‘improvement’.
TL;DR #4: Ignore Player Feedback because you know better Providing apparent safety is often enough
Conclusion and Next Steps
While I skimmed over the actual creation of the track for brevity, I hope that this expedition into a slightly different design process proves useful to you. Even if you dislike Burnout 3 (i am heartbroken </3) and Italian music, I encourage experimenting with physical media in your creative processes.
I almost always have some yarn, rubber bands, and a deck of cards within an arm’s reach, as well as some paper and a nice pencil (I am particular to the now-discontinued Paper Mate American Classic that I own a sizable-but-dwindling supply of).
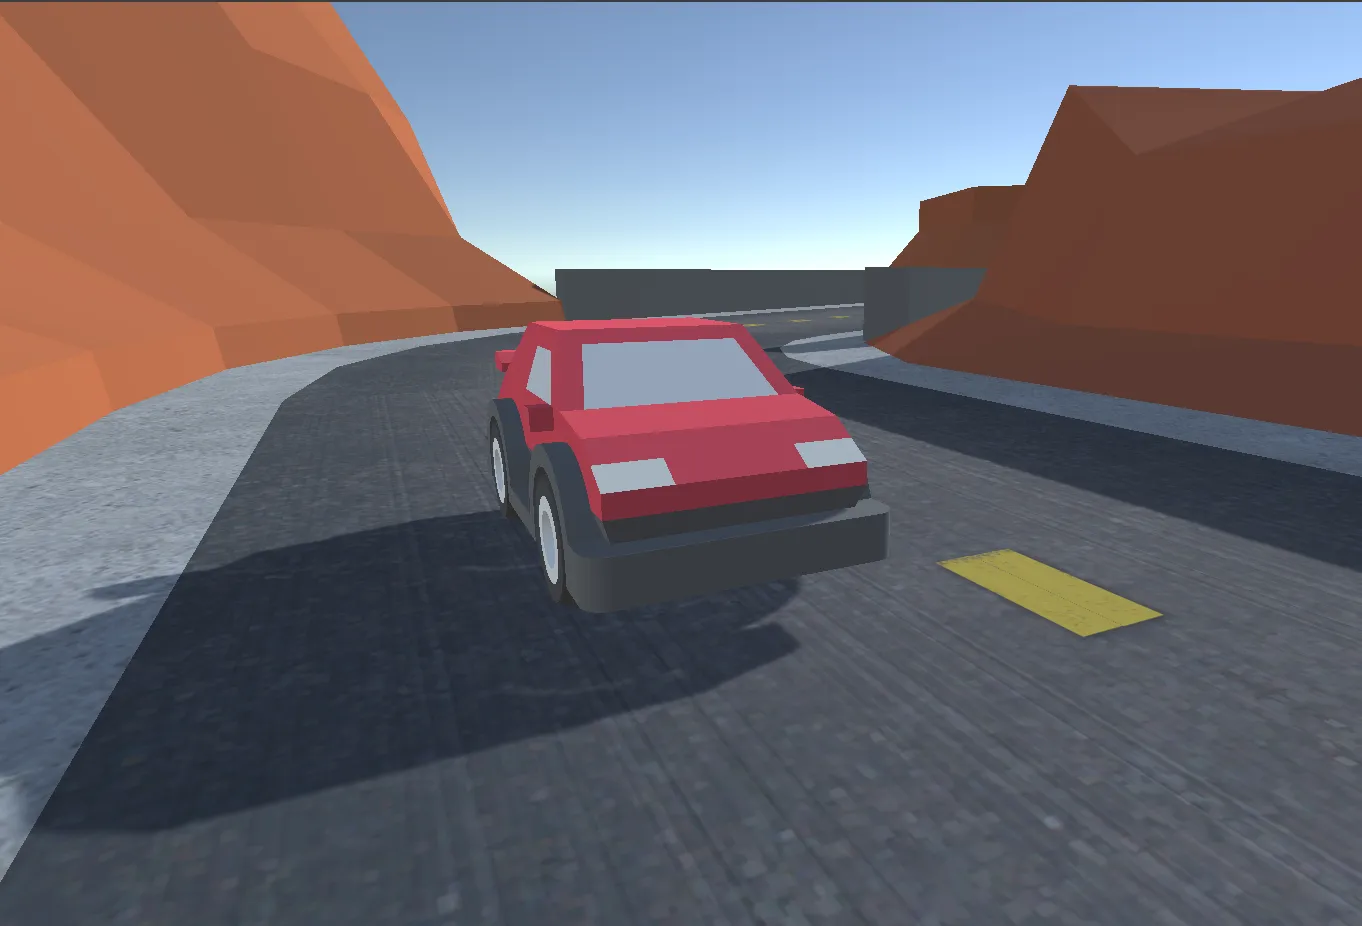
The next article outlines how I handled the logical racetrack representation for my track so AI vehicles (like the one above) could race on it.
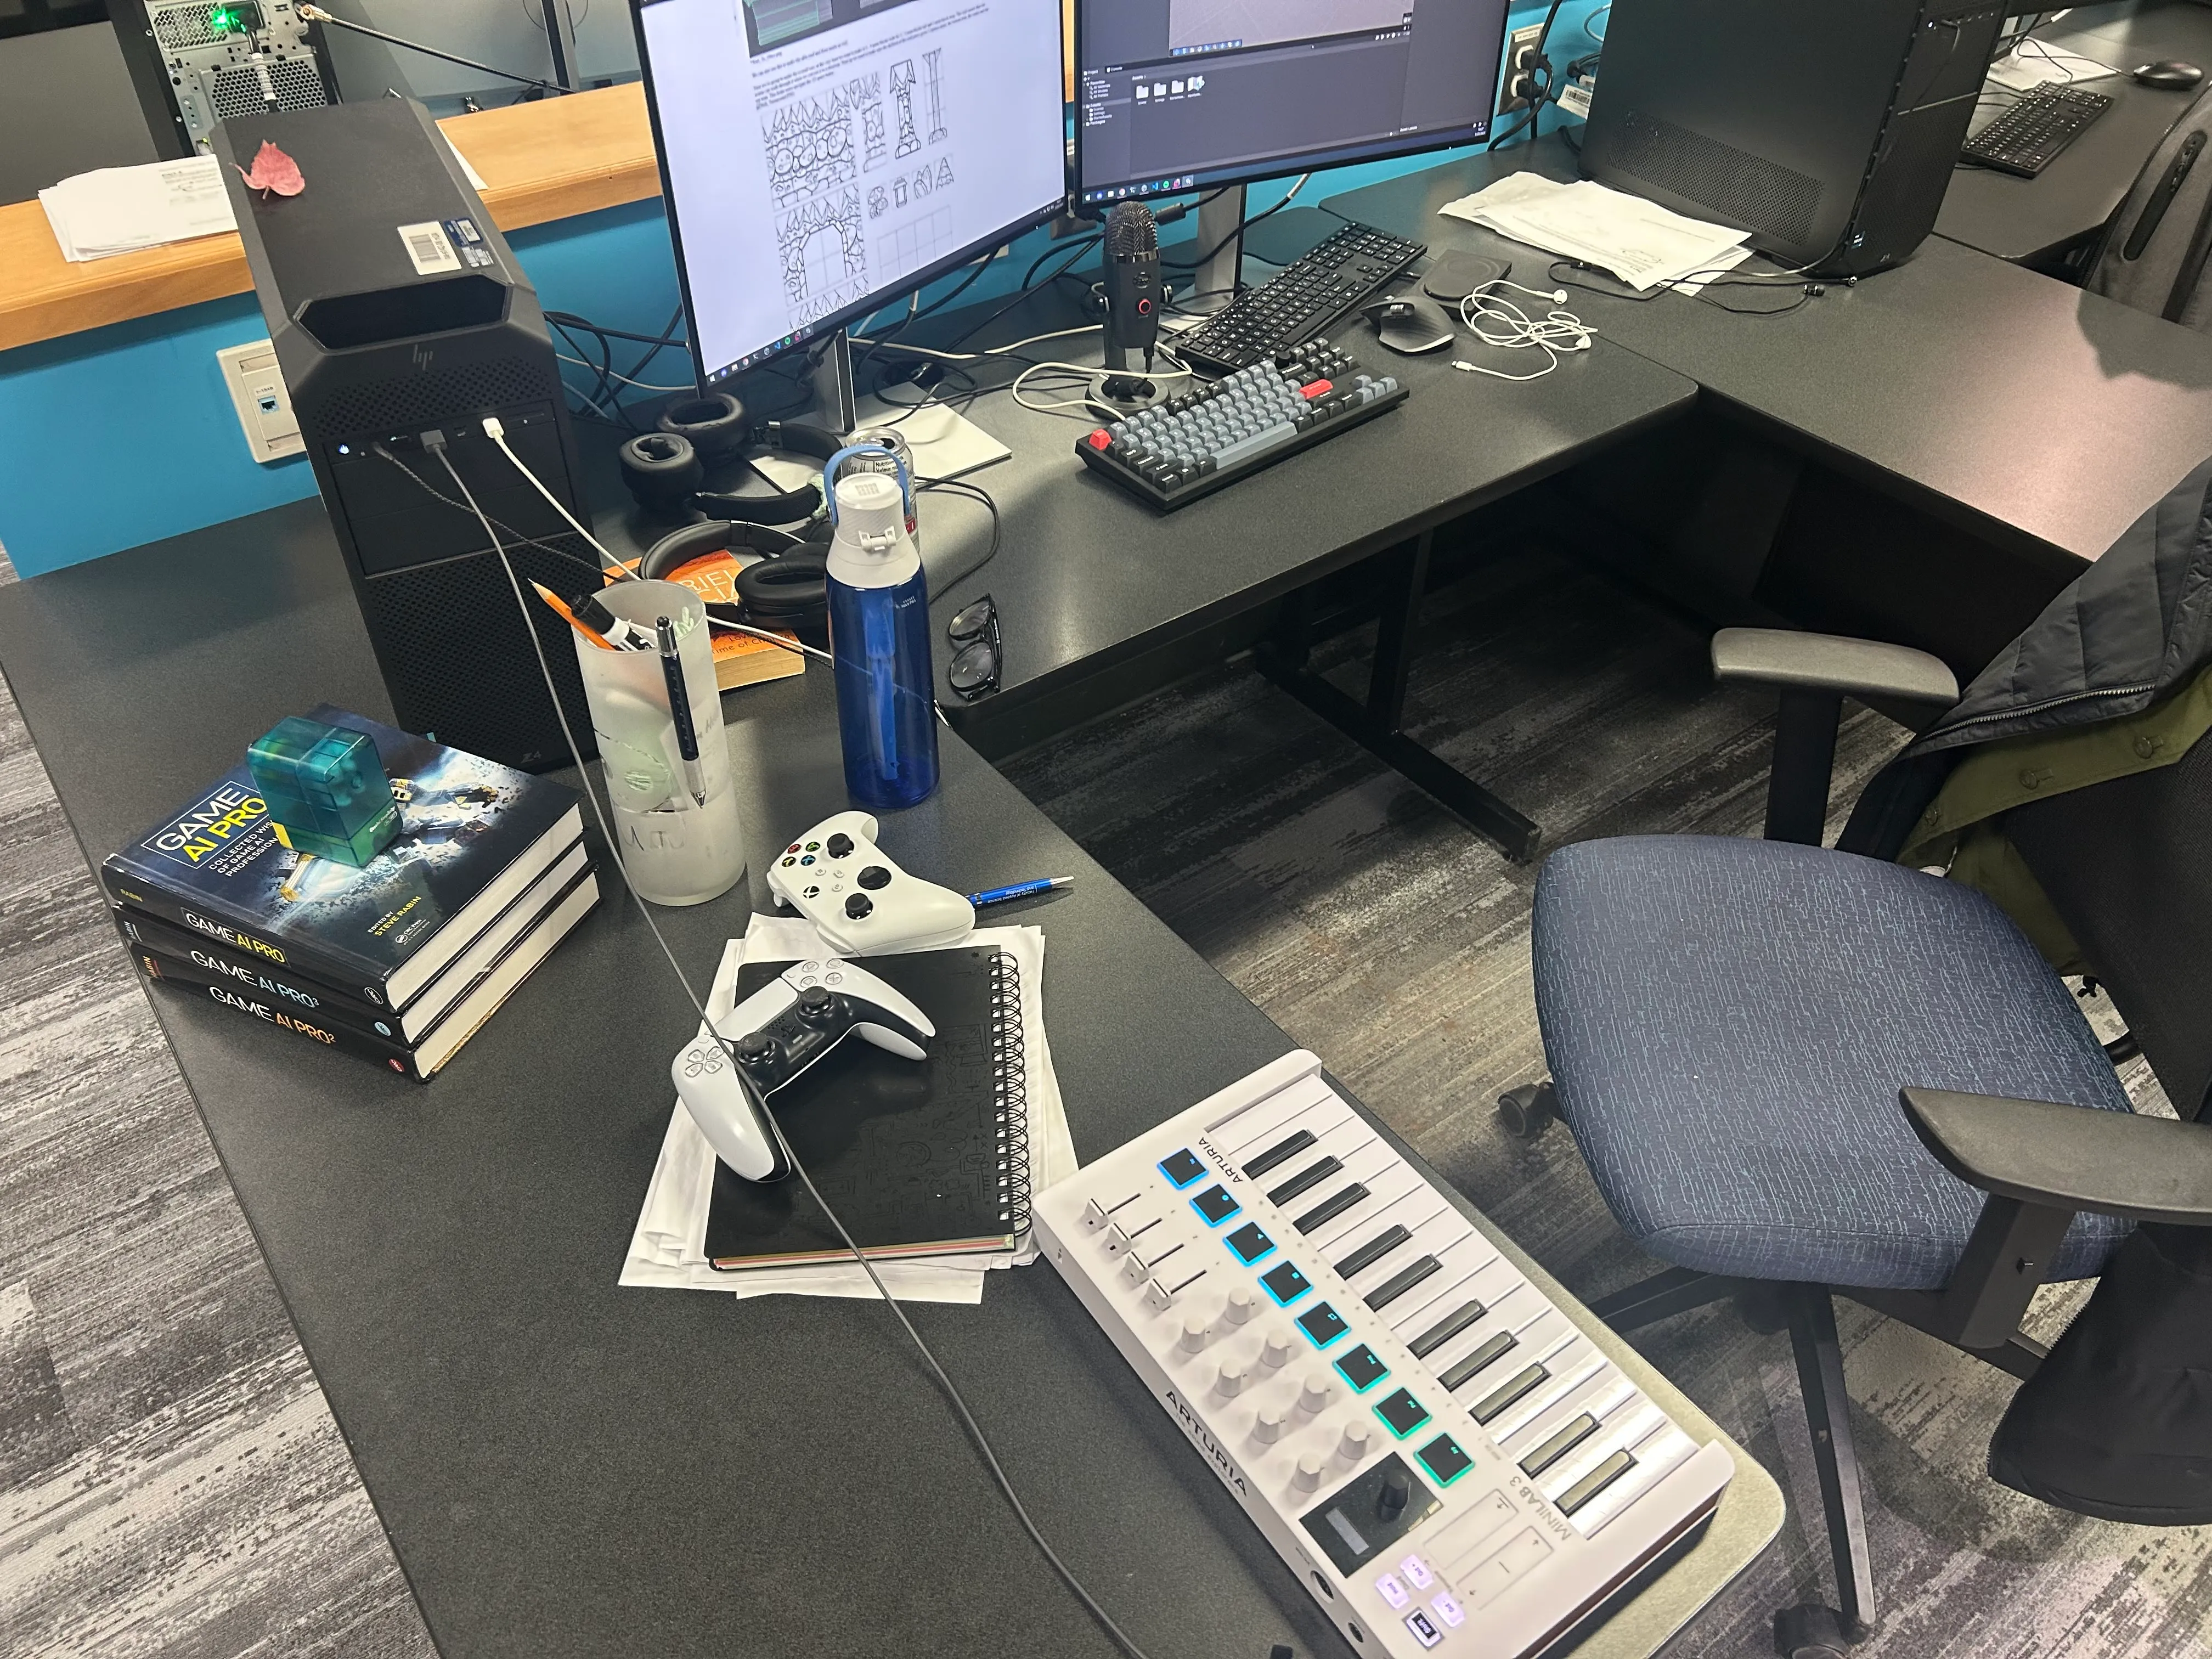
BONUS (Desk Reveal!!)
Thanks for reading! Since you made it all this way, here’s a little sneak peek of my desk from around the time I was working on Switchgrass: